I finally broke down and taught myself to knit. Here is my first project- a child's scarf. As you can see I have yet to sew in the strings but otherwise it's done. I would've liked it to be a bit longer but I ran out of yarn.
Monday, December 20, 2010

Sunday, December 19, 2010
No-Bake Fudgy Snow Balls
These are really yummy, easy and great to make together with kids (Lillian loved shaking the confectioners sugar on using a closed container. Must keep in mind for next year's cookie exchanges!
http://www.skinnytaste.com/2010/12/no-bake-fudgy-snow-balls.html#more
No-Bake Fudgy Snow Balls
Gina's Weight Watcher Recipes
Servings: 21 • Serving Size: 1 cookie • Old Points: 1 pt • Points+: 2 pts
Calories: 69.5 • Fat: 3.8 g • Carb: 9.2 g • Fiber: 2.2 g • Protein: 2.1 g
Add almonds to your food processor and pulse until ground. Add dates, cocoa powder, honey, and water. Mix until it forms a sticky mass. If it seems too dry, add a little water, 1 tsp at a time. Wash hands and using damp hands (keep sink running) measure 1 tbsp and roll into a ball with the dough. Set balls on parchment paper.
Put confectioner's sugar in a bowl. Roll balls in your hand and then roll in sugar.
Can be stored in the fridge for up to a week.
http://www.skinnytaste.com/2010/12/no-bake-fudgy-snow-balls.html#more
No-Bake Fudgy Snow Balls
Gina's Weight Watcher Recipes
Servings: 21 • Serving Size: 1 cookie • Old Points: 1 pt • Points+: 2 pts
Calories: 69.5 • Fat: 3.8 g • Carb: 9.2 g • Fiber: 2.2 g • Protein: 2.1 g
- 15 pitted dates
- 2/3 cup unsweetened cocoa powder
- 1 cup whole roasted unsalted almonds
- 1 tbsp honey
- 2 tbsp water (or more if needed)
- 3 tbsp confectioner's sugar
Add almonds to your food processor
Put confectioner's sugar in a bowl. Roll balls in your hand and then roll in sugar.
Can be stored in the fridge for up to a week.
Monday, December 13, 2010
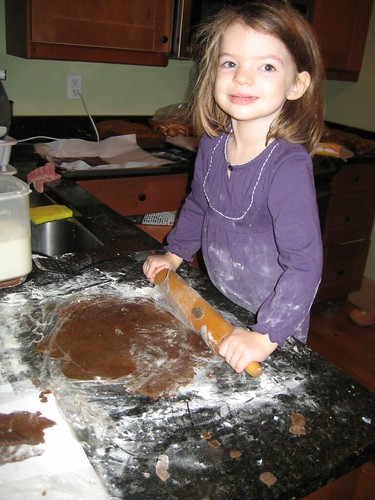
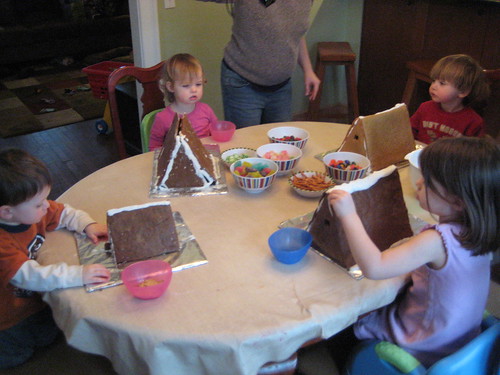
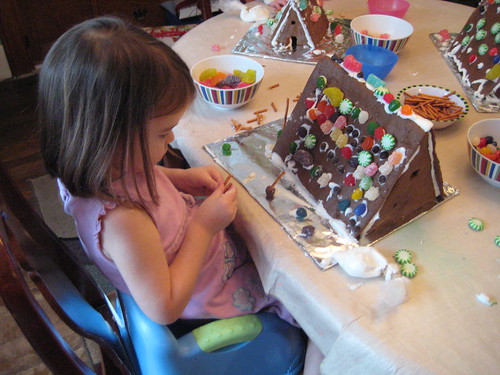
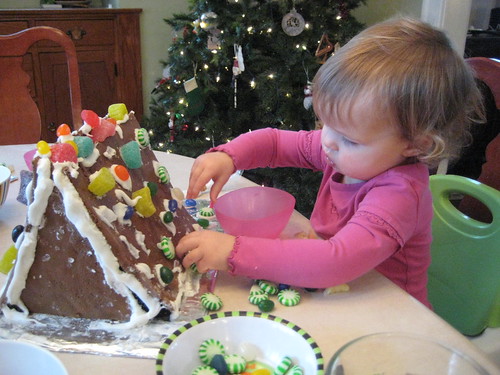
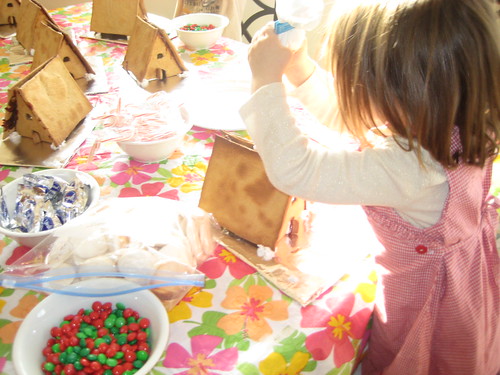
Gingerbread houses
We did it from start to finish! Vegan Gingerbread houses
We made the dough, created templates (2 triangles and two rectangles), rolled it out, baked it, made the icing, put it together and decorated.
We made the dough, created templates (2 triangles and two rectangles), rolled it out, baked it, made the icing, put it together and decorated.
Friday, December 3, 2010
Gingerbread house
I want to make gingerbread houses this year... here is a recipe:
http://vegandad.blogspot.com/2007/12/vegan-gingerbread-house.html
I think I'll need a template... looking into ideas: Here is one like last years:
http://www2.ciachef.edu/media/pdf/CIA_Gingerbread_House.pdf
I'll be back with pictures when we get our act together ;)
Update: I made my own template- exactly like the ones pictured above (two rectangles against two triangles with a little door). And I found the perfect icing recipe here: http://vegetationramblings.blogspot.com/2007/05/molasses-cookies.html
3 tbsp water
2 tbsp egg replacer powder
3 1/2 cups icing sugar
1/8 tsp cream of tartar
Add water to egg replacer and whip with electric beaters until it's thick. Add cream of tartar and 1/2 a cup of the icing sugar and mix until thick. Add another 1/2 cup of icing sugar and whip until thick again. Finally add the last 3/4 of a cup icing sugar and beat until a thick icing forms. If it's too thick (which mine was) add another 1/8-1/4 cup water slowly while beating until it softens a little (I added too much! Disaster area, seriously!!)
as you can see from reading the recipe, it actually calls for less powdered sugar than the list says. But this really works
http://vegandad.blogspot.com/2007/12/vegan-gingerbread-house.html
I think I'll need a template... looking into ideas: Here is one like last years:
http://www2.ciachef.edu/media/pdf/CIA_Gingerbread_House.pdf
I'll be back with pictures when we get our act together ;)
Update: I made my own template- exactly like the ones pictured above (two rectangles against two triangles with a little door). And I found the perfect icing recipe here: http://vegetationramblings.blogspot.com/2007/05/molasses-cookies.html
Reprinted...
Vegan Royal Icing:
3 tbsp water
2 tbsp egg replacer powder
3 1/2 cups icing sugar
1/8 tsp cream of tartar
Add water to egg replacer and whip with electric beaters until it's thick. Add cream of tartar and 1/2 a cup of the icing sugar and mix until thick. Add another 1/2 cup of icing sugar and whip until thick again. Finally add the last 3/4 of a cup icing sugar and beat until a thick icing forms. If it's too thick (which mine was) add another 1/8-1/4 cup water slowly while beating until it softens a little (I added too much! Disaster area, seriously!!)
as you can see from reading the recipe, it actually calls for less powdered sugar than the list says. But this really works
Wednesday, December 1, 2010
Chocolate Recipes worth keeping
"Better-For-You Brownies"
1/2 c. unsweetened cocoa powder
1/2 c. pitted chopped dates
1 tsp. instant coffee granules (I use decaf)
1/2 c. boiling water
1/3 c. walnuts
2/3 c. all-purpose flour
1/2 tsp. baking powder
1/4 tsp. salt
2 T ground flax with 1/3 cup water egg substitute
1 C plus 1 Tbs. sugar
2 T vegetable oil
1 tsp. vanilla extract
-preheat to 350, coat 9 inch sware baking pan with cooking spray
-combine cocoa, dates, coffee. add boiling water and stir until cocoa has dissolved, let stand for 10 minutes or until completely cool
-meanwhile, spread walnuts in shallow baking pan and bake until lightly roasted and fragrant (4-6min). Set aside to cool. Keep oven on.
-In a food processor, combine flour, vaking powder, salt and toasted walnuts; process until walnuts are ground. Transfer mixture to large bowl and set aside.
-With a rubber spatula, scrape cooled cocoa mixture into food processor. Add egg substitute, 1 c sugar, oil an dvanilla and process until smooth, stopping once or twice to scrape down the sides of work bowl. Add to reserved flour mixture and stire just until dry ingredients are moistened
-pour batter into prepared baking pan, spreading evenly. Sprinkle with remaining 1 T sugar. Bake until brownies are firm around edges and just set in center, 25-30 minutes.
-Transfer pan to wire rack and cool completely. To serve, coat sharp knife with cooking spray and cut into 16 squares.
The Best Vegan Chocolate Cake
3 C. four
2 C. Sugar
1/2 C. cocoa
2 tsp. baking soda
1 tsp. salt
2/3 c. oil
2 Tbsp white vinegar
2 tsp. vanilla
2 C. water
-mix dry ingredients
-add water, oil, vinegar & vanilla. Mix well
-put into greased/floured cake pans (2 9"rounds) or muffin cups or any shape you'd prefer. Cake pans take 35 minutes in 350 oven, muffins less. Check by inserting toothpick.
Vegan Chocolate Frosting
1 C. sugar
6 T corn starch
4 T cocoa
1/2 t salt
2 T oil
1 C. water
1/2 t vanilla
-mix sugar, cornstarch, salt and cocoa in medium sauce pan. Whisk in water. Heat over medium utnil it gets thick and starts to boil. Boil for 1-2 minutes (not too long or it will set like taffy) Remove from heat and stir in vanilla & oil. Cool and spread on cooled cake (OR, freeze and use later)
Saturday, November 6, 2010
Doll diaper set for NAMI exchange
For the stocking stuffer exchange I made a doll diaper set. This includes a diaper, a wipe and a wetbag. Here you see Brit the bear showing them off.

Monday, October 25, 2010
Mei Tai for R 10.2010

Here is a little Mei Tai that I made for a 2 year old birthday boy. He has a baby sis on the way and his mama has one just like it. Of course, Lillian thinks she needs one now too.

Sunday, September 5, 2010
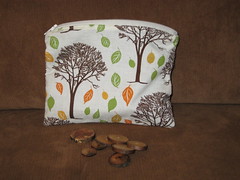
Tree Swap
Here is the little bag that I made for the recent tree swap. You can't see, but the inside is lined with brown fabric & I included a bunch of wooden 'coins' sealed with beeswax.
Wednesday, September 1, 2010
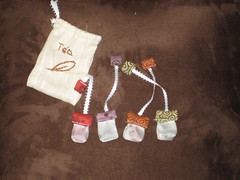
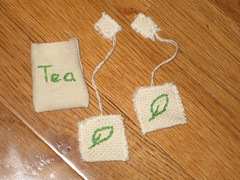
Tea Bags for a birthday girl
Here is the 3rd type of tea bag and so far, my favorite. The last ones used cotton embroidery thread which was breaking down so I tried ribbon this time. I like it a lot better. These are for a 2 year old's birthday.
Wednesday, August 18, 2010
One of my favorite recipes... though I totally screwed it up tonight. Don't cook the glaze for too long or you get hard cherry candy. I usually use the glaze on pork or chicken.
Cherry-Glazed Pan-Seared Lamb Chops
Cherry preserves and balsamic vinegar combine for a quick, tasty glaze. Pair with couscous to soak up any extra pan sauce.
Yield: 4 servings (serving size: 2 lamb chops and 3 tablespoons glaze)
Ingredients
- Cooking spray
- 2 teaspoons dried rosemary
- 1/2 teaspoon salt
- 1/2 teaspoon black pepper, divided
- 8 (4-ounce) lamb loin chops, trimmed
- 2 teaspoons bottled minced garlic
- 1/2 cup fat-free, less-sodium beef broth
- 1/2 cup cherry preserves
- 1/4 cup balsamic vinegar
- Parsley sprigs (optional)
Preparation
Heat a large nonstick skillet over medium-high heat. Coat pan with cooking spray. Combine rosemary, salt, and 1/4 teaspoon pepper in a small bowl, stirring well. Rub spice mixture evenly over both sides of lamb. Add lamb to pan; cook 5 minutes on each side. Remove lamb from pan. Wipe pan clean with paper towels.
Return pan to medium heat; recoat with cooking spray. Add garlic to pan; cook 30 seconds. Add remaining 1/4 teaspoon pepper and broth; cook 1 minute, scraping pan to loosen browned bits. Stir in preserves and vinegar; cook 3 minutes or until slightly thick. Return lamb to pan; turn to coat. Cook 1 minute or until desired degree of doneness. Garnish with parsley sprigs, if desired.
http://find.myrecipes.com/recipes/recipefinder.dyn?action=displayRecipe&recipe_id=1634751
Friday, August 13, 2010
2 Year old birthday girl


Our little friend is turning two tomorrow so I made a little apron and craft bag (with paint and brushes inside). The pattern fabric, ribbon and zipper are from Arts and Scraps (the purple fabric is something from another project).
Sunday, July 18, 2010
Beer Battered Fish Recipe
Not bad!
http://www.eatingwell.com/recipes/beer_battered_fish_tacos_with_tomato_avocado_salsa.html
http://www.eatingwell.com/recipes/beer_battered_fish_tacos_with_tomato_avocado_salsa.html
- 3 tablespoons all-purpose flour
- 1/8 teaspoon ground cumin
- 1/8 teaspoon salt
- 1/8 teaspoon cayenne pepper, or to taste
- 1/3 cup beer
- 8 ounces tilapia fillet, cut crosswise into 1-inch wide strips
- 2 teaspoons canola oil
- Combine flour, cumin, salt and cayenne in a medium bowl. Whisk in beer to create a batter.
- Coat tilapia pieces in the batter. Heat oil in a large nonstick skillet over medium-high heat. Letting excess batter drip back into the bowl, add the fish to the pan; cook until crispy and golden, 2 to 4 minutes per side. Serve the fish with tortillas and salsa.
Grocery Bag for 2 year old Birthday Boy

Our 2 year old friend is having a kitchen themed birthday and I made him this little grocery bag. It's my favorite of my bags yet. I used the good ribbon that I bought a while back for a puppet theater (it was the wrong color) which I think just made the bag.
Saturday, July 17, 2010
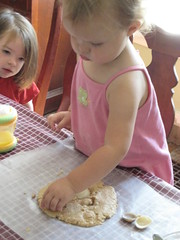
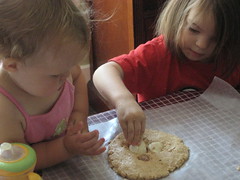
Sea Shell Project
Oma sent along some beautiful sea shells from the beach and the moment Lillian saw them she exclaimed "I have to make a project!" So we talked about the different ways to hold them onto something and agreed that modeling clay would probably work best. Because I didn't have any on hand I was able to convince her to wait for a day. This morning I looked up a recipe and came across this sawdust clay Well, sawdust is something we have plenty of around here. So we whipped up a batch of sawdust clay & Lillian put her shells in it. As she started to place them we noticed that the clay color was very similar to a beach- how perfect!
The sawdust:
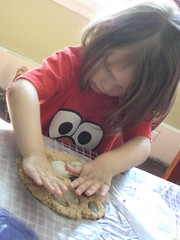
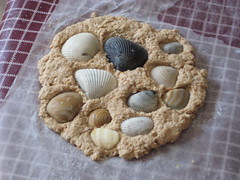
Ok, it sorta looks like a cookie too. But as Phoebe can tell you, it doesn't taste any good.
The sawdust:
Ok, it sorta looks like a cookie too. But as Phoebe can tell you, it doesn't taste any good.
Tuesday, June 1, 2010
Oatmeal Cookies
This recipe is a keeper:
1.5 C Flour
1 t Baking Soda
1 t Salt
(mix, set aside)
3/4 c Canola Oil
1 1/3 C Sugar
(cream)
2 T rice milk
(mix)
2 egg replacer eggs (Ener-G works great)
(add slowly & mix)
1.5 T Vanilla (yes, that is right- TABLEspoons)
(add & mix until constant color)
2.5 C Quick oats
Chocolate Chips
(add & mix)
1.5 C Flour
1 t Baking Soda
1 t Salt
(mix, set aside)
3/4 c Canola Oil
1 1/3 C Sugar
(cream)
2 T rice milk
(mix)
2 egg replacer eggs (Ener-G works great)
(add slowly & mix)
1.5 T Vanilla (yes, that is right- TABLEspoons)
(add & mix until constant color)
2.5 C Quick oats
Chocolate Chips
(add & mix)
350 for 9-15 minutes- don't wait for them to brown, they won't.
Sunday, May 30, 2010
Travel Toy Swap
 I finally finished my latest Bits of Goodness swap item. It's a fabric book for the Travel Toy Swap. I think each one took me 3-5 hours. It's been a lot of work. Each one has a little wooden figure that can travel through the pages. He can pack his teddy bear in the bag, go for a ride in the car, swim in the ocean, eat lunch & cozy up in bed.
(I meant to post this a while ago...)
Monday, May 24, 2010
The Grill
This Mother's day I asked for a Grill & I got something even nicer than I expected! It has three burners (which apparently is going to be awesome once I really figure out how to grill) and lots of space for food. We had some friends over for kabobs the other night and I bought tofu for our veggie friends who decided not to have it. So tonight I tried a new recipe with tofu (and tested the soy allergy) and it was absolutely awesome. Here is a rough estimate of what I did:
Grilled Tofu Peanut Satay
Tofu
Marinade:
Olive oil
ground ginger
brown sugar
red wine vinegar
cumin
coriander
Peanut butter (2 Tbsp?)
salt
Grilled Tofu Peanut Satay
Tofu
Marinade:
Olive oil
ground ginger
brown sugar
red wine vinegar
cumin
coriander
Peanut butter (2 Tbsp?)
salt
Peanut Sauce (adapted from here: http://www.phoo-d.com/2010/01/shrimp-and-tofu-satay.html)
3/4 cup coconut milk (light is fine)
6 Tbsp peanut butter
1 Tbsp lemon juice
1 Tbsp sesame oil
1 tsp brown sugar
1/2 tsp ground cumin
1/2 tsp ground coriander
1. Drain Tofu & cut into 6 'fingers'
2. Marinade in mix above
3. Grill
4. Prepare sauce by mixing and letting sit
5. Dip grilled Tofu in sauce.
I also served my favorite bean & corn recipe that I always forget about: http://www.wholefoodsmarket.com/recipes/558
1. Drain Tofu & cut into 6 'fingers'
2. Marinade in mix above
3. Grill
4. Prepare sauce by mixing and letting sit
5. Dip grilled Tofu in sauce.
I also served my favorite bean & corn recipe that I always forget about: http://www.wholefoodsmarket.com/recipes/558
Wednesday, May 19, 2010
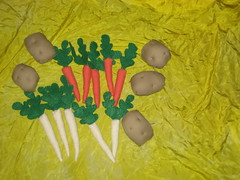
May 2010 Play Food Craft Exchange
Here is what I made for my second set for the exchange. It's carrots, parsnips & potatoes. I will update with the rest of the exchange photos soon.
Saturday, May 8, 2010
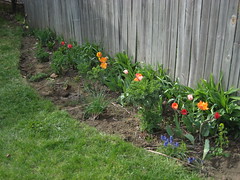
The front garden
Pat has been working incredibly hard to help me with the improvement of the front garden. I am pretty excited about how things have turned out. Eventually we want to put something with color in the front & I plan to put a whole bunch of bulbs in come fall.
Before (Nov 2009):
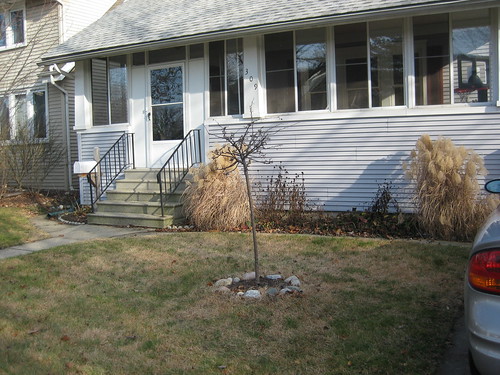
After (May 2010):

Before (Nov 2009):
After (May 2010):
Friday, May 7, 2010
Mayday
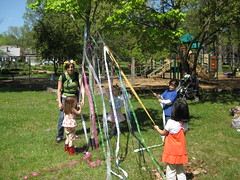
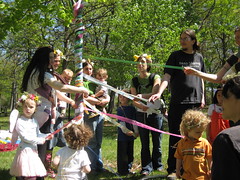
A few days late... just thought I'd share the mayday celebration we had with some NAMI friends. We were rained out on the 1st so we celebrated on the 3rd which turned out to be the perfect day for an outdoor celebration.
Wednesday, May 5, 2010
Yummy mexican meal
Today is cinco de mayo and despite the fact that I have no really good reason to celebrate it I thought I'd pull out some Mexican-ish recipes. Both of these turned out awesome
Crock Pot Chicken Fajitas:
http://kalynskitchen.blogspot.com/2005/08/chicken-fajitas-in-crockpot-from.html
Cinnamon Treats (I didn't make jack-o-lantern faces in mine):
http://www.mexgrocer.com/348-jackolantern-cinnamon.html
Crock Pot Chicken Fajitas:
http://kalynskitchen.blogspot.com/2005/08/chicken-fajitas-in-crockpot-from.html
Cinnamon Treats (I didn't make jack-o-lantern faces in mine):
http://www.mexgrocer.com/348-jackolantern-cinnamon.html
Sunday, May 2, 2010
Playfood Smores
Here are my smores for the upcoming NAMI exchange. I'm pretty excited about how they turned out. You can't tell in the picture, but the graham crackers are made of an upholstery fabric that has little dots on it (like the holes in graham crackers), the chocolate bar is cotton knit and I'm not quite sure of the marshmallows (all the fabrics are from Arts & Scraps). I think it might be some sort of wool, Goldie thinks it's fleece. I'll have to get some other opinions. But whatever it is, it's perfect for a play marshmallow.

Sunday, April 25, 2010
Craft Exchange
As I am getting ready for the upcoming NAMI craft exchange I realized that I never posted what I received from the last one. Here it is:


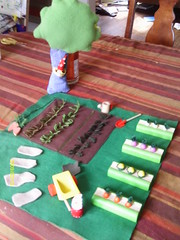
Snail from Jane, Mushrooms from Brynn, Playmat from Goldie with Tree from Chelsea (with garden set the girls got from Brynn for their birthday)
Snail from Jane, Mushrooms from Brynn, Playmat from Goldie with Tree from Chelsea (with garden set the girls got from Brynn for their birthday)
Tuesday, April 13, 2010
Oatmeal Fudge Bars
These are awesome!! Thanks, Evie, for finding this recipe
http://www.foodallergymama.com/2010/04/11/dairy-egg-and-nut-free-oatmeal-fudge-bars/?utm_source=Food+Allergy+Mama+News&utm_campaign=8a2d8c506a-RSS_EMAIL_CAMPAIGN&utm_medium=email
http://www.foodallergymama.com/2010/04/11/dairy-egg-and-nut-free-oatmeal-fudge-bars/?utm_source=Food+Allergy+Mama+News&utm_campaign=8a2d8c506a-RSS_EMAIL_CAMPAIGN&utm_medium=email
DAIRY, EGG AND NUT FREE OATMEAL FUDGE BARS
OATMEAL LAYER
1/2 c. dairy free shortening
1 c. brown sugar, firmly packed
1/4 c. unsweetened applesauce
1 tsp. vanilla
1 c. unbleached all purpose flour
1/2 tsp. baking soda
1/2 tsp. salt
2 c. old fashioned or quick cooking oats (I prefer old fashioned but use whatever you have)
FUDGE LAYER
1/2 c. unbleached all purpose flour
1/4 c. granulated sugar
1 1/2 dairy free chocolate chips (Enjoy Life or Divvies)
4 T. dairy free margarine (I use Fleischmans)
1 T. water
Preheat oven to 350 degrees and spray an 8 inch glass Pyrex baking dish with dairy free baking spray. Set aside.
In the bowl of a mixer fitted with the paddle attachment (or use a medium bowl with a wooden spoon) combine the shortening and sugar until light and fluffy. Add applesauce and vanilla and thoroughly combine. In a small separate bowl combine the flour, baking soda and salt with a wire whisk. Add to shortening mixture and stir well. Stir in oats. Reserve 1 cup of oatmeal mixture for topping. Spread the rest into the prepared glass dish using the back of a spoon or your fingers. Set aside.
Make Fudge Layer: In a microwave safe bowl combine the chocolate chips and dairy free margarine. Heat in the microwave 20 seconds at a time until the chips are just melted. Add 1 T. water and stir with a rubber spatula until combined. In a small bowl combine the 1/2 c. flour and 1/4 c. sugar with a wire whisk. Add the chocolate mixture to the flour mixture and stir until combined. Spread the fudge layer over the oatmeal layer. Sprinkle top with the reserved oatmeal mixture and spread with the back of a spoon or your fingers. Bake 20-25 minutes or until lightly browned. Cool completely before cutting into squares.
Monday, April 12, 2010
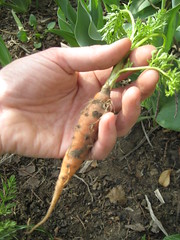
Garden
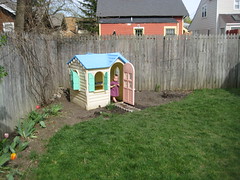
This weekend was an absolutely perfect spring weekend. I got to spend lots of time out in the yard getting the garden in order for the season. The big project I took on was to reshape the beds so that I had a nook for the playhouse & a little bit more room for the herbs & veggies. I believe I transplanted about 50 ft2 of grass and amazingly, I had just the right amount to fill in the parts that needed to be filled. I'm pretty happy with how things turned out. Oh, and when I took a closer look at my garden I found one of the carrots I never dug up last year. It was incredibly fragrant. There are a couple more in there and I think I'm going to see if they grow a bit more. Now I've got to decide what exactly to plant around the playhouse... fun, fun, fun!!
Mochi
My friend, Katherine introduced me to a new decadent treat; mochi! It is free of virtually all allergens and super yummy. We stuffed ours with honey and my only complaint is that it's a bit on the pricey side (though, perhaps that is a good thing or I'd be eating it constantly...) Here is a video to check it out:
http://www.cookusinterruptus.com/index.php?video_id=129
Thanks, Katherine!
http://www.cookusinterruptus.com/index.php?video_id=129
Thanks, Katherine!
Sunday, April 11, 2010
Bird Feeder
Lillian and I had some friends over to make a bird feeder & here is our final project. She strung all the beads & painted the spoons. We hung it up but I'm thinking the birds don't like it as much as I do b/c it's still completely full.
Saturday, April 3, 2010
Lotion
An idea for later.... From Rosemary Gladstar's Herbal Recipes for Vibrant Life
Lotion
Waters:
2/3 cup distilled water (or rose water if you want a floral scent)
1/3 cup aloe vera gel
1 or 2 drops essential oil of choice (optional)
Vitamins A and E as desired
Oils:
3/4 cup apricot, almond or grapeseed oil
1/3 cup coconut oil or cocoa butter
1/4 teaspoon lanolin
1/2 to 1 ounce grated beeswax
1. Combine the waters in a glass measuring cup and set aside until they have reached room temperature.
2. In a double boiler over low heat, combine the oils. Heat them just enough to melt.
3. Pour the oils into a blender and let them cool to room temperature. The mixture should become thick, creamy, semisolid and cream colored. This cooling process can be hastened in the refrigerator, but keep an eye on it so it doesn't become too hard.
4. When the mixture has cooled, turn on the blender at its highest speed. In a slow, thin drizzle, pour the water mixture into the center vortex of the whirling oil mixture.
5. When most of the water mixture has been added to the oils, listen to the blender and watch the cream. When the blender coughs and chokes and the cream looks thick and white, like buttercream frosting, turn off the blender. You can slowly add more water, beating it in by hand with a spoon, but don't overbeat! The cream will thicken as it sets.
6. Pour into cream or lotion jars. Store in a cool location.
Notes: It is *very* important for the oils and the waters to be at room temperature - if they are not, they will not combine correctly and may separate. It is also important to have the oils in the blender and add the waters to them. Supposedly this order makes a big difference in getting the oils and the waters to combine easily. Also, if you are grating your own beeswax, it is a good idea to use a beeswax-only grater, as you will likely never get all the beeswax off of it...
From Rosemary Gladstar’s Family Herbal
Thursday, April 1, 2010
Doll Carrier for 3 year old birthday girl

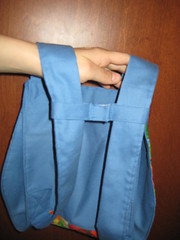
We are going to be going to a birthday party for a 3 year old so Lillian and I made her a little gift. It's a doll carrier. I think I've improved the design from my earlier models. It now has a velcro latch in the front & the straps are a better size. Lillian picked out the fabric, helped cut the fabric and pressed down the pedal on the sewing machine.
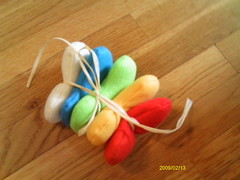
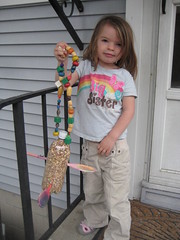
Ribbon Wands
Here are the ribbon wands I made for my NAMI craft exchange. 7 wands in total, 5 for the swap and one each for the girls from the bunny.

Thursday, March 11, 2010
NAMI Postcard Exchange
We joined a postcard exchange with some NAMI buddies. Here is Lillian working on her postcards. We used painters tape & watercolors.
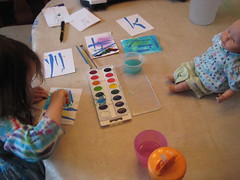
Here are the finished cards. Phoebe used paints, but her process was too messy to catch on camera:
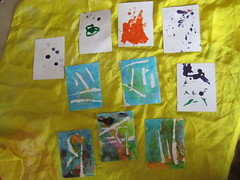
Here are some of the cards we received today:

Here are the finished cards. Phoebe used paints, but her process was too messy to catch on camera:
Here are some of the cards we received today:
Bits of goodness kitchen swap 2010 (10 items received)
Look at all the goodies I got in the kitchen swap from bits of goodness!

Easter Bags
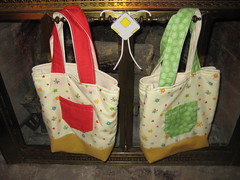
The Easter bunny is finally going to make an appearance at the Navin household now that Lillian is 3 (this age rocks!!) Instead of baskets that would go unused the rest of the year I decided to make Easter bags for the girls. Lillian's is the red & Phoebe's is the green. Lillian's has since had a button added to it- the button she picked out when I made her come along to purchase some craft items. Somehow Lillian picked the most expensive single button ($1.59). I'll update with the button later...
Tuesday, March 9, 2010
5 Little Monkey (Puppets)

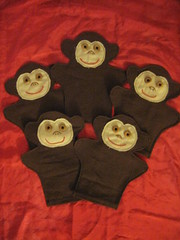
So, here are the monkey puppets: I think I'll package them with a few dried bananas for fun.
Monday, March 1, 2010
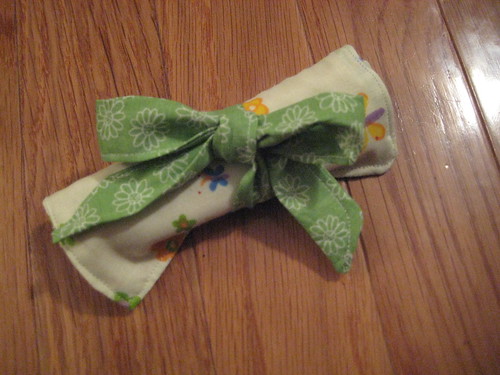
Crayon Wrap
For the upcoming Easter swap I will also make a crayon wrap... here is my inspiration:
http://makeitandloveit.blogspot.com/2009/01/crayon-roll.html
http://www.skiptomylou.org/2007/04/25/on-a-roll/
I decided to make mini rolls for on the go. Here they are:

http://makeitandloveit.blogspot.com/2009/01/crayon-roll.html
http://www.skiptomylou.org/2007/04/25/on-a-roll/
I decided to make mini rolls for on the go. Here they are:
Puppet

Well, here we go again. I have joined another swap- the Easter swap. I'm hoping to put the goodies received into the girls' Easter baskets. And I've decided for this swap I'm going to make puppets for one of my slots. I saw puppets at our pediatirican's office that I thought I could make and then found the picture here: http://images.landofnod.com/is/image/LandOfNod/3710122_AnimalPuppets_F108?$zm$
Here is the first attempt to make the monkey (which I figured would be the easiest)
I obviously need to trim the strings and I think I should probably top-stitch it but even with those things it's not quite as I had hoped it would be.
I think I'm going to look into making a chick using this as a guide
Sunday, February 28, 2010
Lentil Recipe to try
Sloppy Lentils
1 tablespoon olive oil or coconut oil
1 medium-size onion, diced
1 small red or green bell pepper, seeded and diced
1-2 tablespoons chili powder
1-1/2 cups dried brown or green lentils, picked over and rinsed
One 14.5-ounce can crushed tomatoes
3 cups water
2 tablespoons tamari or other soy sauce
1 tablespoon prepared mustard
1 tablespoon light brown sugar or a natural sweetener
1 teaspoon salt
Freshly ground black pepper
1. Heat the oil in a medium-size skillet over medium heat. Add the onion and bell pepper, cover, and cook until softened, about 5 minutes. Add the chili powder, stirring to coat.
2. Transfer the onion mixture to a 3-1/2 to 4 quart slow cooker. Add the lentils, tomatoes, water, tamari, mustard, brown sugar, salt and pepper to taste and stir to combine. Cover and cook on Low for 8 hours (or high for 4 hours).
3. Serve on lightly toasted burger buns or over rice or pasta.
Wednesday, February 24, 2010
Scones
BROWN SUGAR SCONES
2 Cups All Purpose Flour
1/2 Cup Whole Wheat Flour
1/4 Cup Dark Brown Sugar, loosely packed + 1 Tablespoon
1 1/2 teaspoons Baking Powder
1/2 teaspoon Baking Soda
1/2 teaspoon Salt
1/2 Cup Vegetable Shortening
3/4 Cup Soy Milk
1/2 Cup Maple Syrup
Preheat the oven to 400ºF.
Line a baking sheet with parchment paper.
In a large bowl, combine the flours, baking powder, baking soda, 1/4 cup of brown sugar and salt.
Add and cut in the shortening with either two knives or a pastry cutter to a coarse crumb texture.
Add the milk and maple syrup and stir well with a wooden spoon until the dough comes together, finishing up by hand if necessary to form a ball.
Transfer the dough ball to the parchment lined baking sheet and flatten to 3/4″.
Cut the dough into 8 wedges and sprinke with the 1 tablespoon of remaining brown sugar.
Bake for about 20 – 25 minutes or until golden.
I substituted rice milk for the soy milk, honey for the maple syrup and a mix of palm oil/coconut oil for the shortening. And I threw some raisins in too.
Tuesday, February 23, 2010
Cornbread
I am on a search for a great cornbread. TJ's brand is our current favorite but b/c we didn't have any around I tried making this one from scratch. It was pretty good but a bit dry. Perhaps I'll play with the recipe:
Blue Ribbon Vegan Cornbread?
I was skeptical that pareve cornbread could be moist at all, never mind an award winner. Imagine my surprise when Cook’s Illustrated reported a recipe for vegan cornbread that actually won the blue ribbon at the Iowa State Fair… and those folks know their corn.
DANA SLY’S BLUE RIBBON VEGAN CORNBREAD
Serves 9
2 Tbsp. ground flax seed
6 Tbsp. water
1 C all-purpose flour
1 C cornmeal
1/4 C sugar
4 tsp. baking powder
3/4 tsp. table salt
1 C soy milk
1/4 C canola oil
- Adjust oven rack to middle position; heat oven to 425 degrees. Spray 8-inch-square baking dish with nonstick cooking spray.
- Bring the water to a boil in a small saucepan. Add the ground flax seed, reduce the heat to medium-low, and simmer the ground flax seed in the water for 3 minutes or until thickened, stirring occasionally. Set aside.
- In a medium bowl, whisk together the flour, cornmeal, sugar, baking powder, and salt until well-combined.
- Add the ground flax seed mixture, soy milk, and canola oil to the flour mixture. Beat just until smooth (do not overbeat.)
- Turn into prepared baking pan. Bake for 20 to 25 minutes, or until a toothpick inserted in the middle comes out clean.
- Cool on wire rack 10 minutes; invert cornbread onto wire rack, then turn right side up and continue to cool until warm, about 10 minutes longer. Cut into pieces and serve.
Sunday, February 21, 2010
Roasted Cauliflower
I've been meaning to make this forever... Recipe from a NAMI event from Shana:
Roasted Cauliflower
5 to 6 cups cauliflower florets, about 1 1/2 inches in diameter (from 1 medium cauliflower)
1/4 cup extra-virgin olive oil
1 tablespoon sliced garlic
2 tablespoons lemon juice
1 teaspoon salt
1/2 teaspoon black pepper
2 tablespoons grated Parmesan (I usually omit this)
Chopped chives, for garnish (I always forget this)
Preheat the oven to 500 degrees F.
Place the cauliflower florets in a large saute pan or a roasting pan (I use a 9x13 glass pan). Drizzle the olive oil over the cauliflower, and season with the garlic, lemon juice, salt and pepper. Place the saute/roasting pan in the oven and cook for 15 minutes, stirring occasionally to ensure even roasting. Remove from the oven and sprinkle with chopped chives and serve immediately while still warm.
Friday, February 19, 2010
Granola Bars
I think I found my new favorite granola bar recipe ! We used cheerios for the dry cereal and it gives the perfect amount of crunch. Yummy!! Here is the recipe reprinted:
Alicia's Mix and Match Granola Bars
Makes about 20 full sized bars or 30 smaller bars
Ingredients:
4 cups quick cooking oats
3 cups dry cereal *
2 cups dried fruit **
1 cup nuts or seeds ***
1 cup packed brown sugar
1 cup honey (I used part agave)
1 cup sunbutter, soy nut butter or peanut butter
2 tsp real vanilla
1. Grease and set aside a 9x13 or 10x14 inch baking pan.
2. In a very large bowl, stir together the oats, cereal, fruit and nuts.
3. Heat the brown sugar and honey in a pan over medium heat, stirring often, just until boiling. Remove from heat and stir in the nut butter and vanilla.
4. Pour hot mixture over dry mixture and mix well. (If you are adding in chocolate chips, allow the mixture to cool slightly so they do not melt.)
5. Press very firmly into prepared pan (wetting your hands can help a bit). Allow to cool and cut into bars.
* Good dry cereal choices are rice crispies, cheerios and corn flakes. Rice crispies are perfect but anything crunchy will do.
** Dried fruit options include raisins, cranberries, blueberries, cherries, pineapple, etc. Diced prunes are surprisingly sweet and delicious but they're rather sticky. I dust them with powdered sugar to chop them so they don't make a sticky mass. You can also add ingredients like coconut and chocolate chips. Our favorite mix so far is chopped prunes, tart cherries, coconut and some white chocolate chips. You can also do themes like tropical with coconut, papaya, pineapple...
*** Any nuts or seeds will do. These contribute protein, texture and a bigger health punch. Options include sunflower seeds, chopped almonds, pecans, sesame seeds, flax seeds....
I wrap these in aluminum foil for on-the-go snacks. They can be kept at room temperature or refrigerated. They are slightly sticky and soft at room temperature, or at least they are in the summer.
Enjoy!
Thursday, February 18, 2010
Tea Bags for Bits of Goodness 2/2010
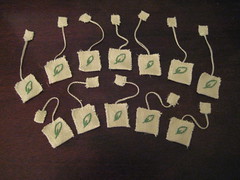
 I'm up way too late once again but I just had to add my latest creations. I finished all 12 tea bags for the bits of goodness craft exchange. But then of course, I decided that they needed nifty little bags so I suppose I have 5 more bags to make. I'm guessing it won't take long. As far as I know they are entirely 'natural' so hopefully they will be acceptable for the exchange. Lillian's tea bags, on the other hand, will be colorful and synthetic. Which reminds me... I need to finish Lillian's tea bags for her Feb 25th birthday!
Tea Bags for Bits of Goodness 2/2010
Originally uploaded by DDN and friends
Subscribe to:
Posts (Atom)